Confocal Microscopy: Principles & Experiments
OBJECTIVE: In
traditional wide field fluorescence microscopy, we cannot get image of high
quality for thick specimen. In confocal microscopy, a pinhole is used to get
image of the focus by rejecting the out of focus lights, and hence we can have images
of better resolution and contrast of thick samples.
THEORY: The
whole light coming out of a fluorescent sample is collected in the case of
traditional wide filed microscopy whereas, in the confocal microscope, first
the image light is focused onto a point (optically conjugate plane of the
image), and there a pinhole of proper size is placed to get rid of the light
coming from the other portion of the sample and thus getting the image of the
focal plane only. Here, first a Continuous Wave (CW) laser light is focused on
the fluorescent sample using microscope objective to excite the sample. Then
the fluorescence coming from the sample is collected by the same microscope
objective. The fluorescence signal is separated through a dichroic mirror and
then focused and defocused before it goes to the detector and at that focal
point, a pinhole called confocal aperture is placed to remove the fluorescence
generating from outside of the focal spot region.
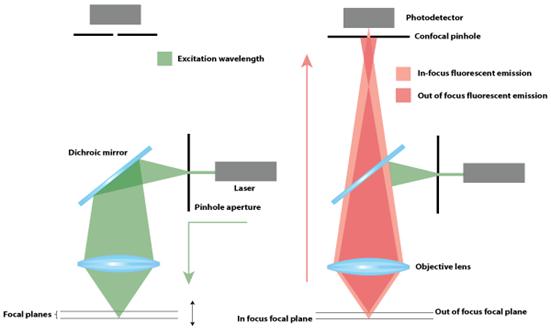
Schematic
of Confocal Microscopy
INSTRUMENTS REQUIRED:
- Excitation
Laser
- Microscope
- Microscope
Objective
- Fluorescent
Sample
- Dichroic
Mirror
- Lenses
- Pinhole
- Detector
SOFTWARE REQUIRED:
- FLUOVIEW
Note: For user
operation and usage no specific software needed.
EXPERIMENT PROCEDURE:
1.
Turn
on the excitation CW Laser.
2.
Place
a drop of immersion oil on the oil immersion microscope objective of a specific
magnification.
3.
Place
the microscopic slide of stained live cell on the sample plane.
4.
Tighten
it with the clamps.
5.
Turn
on the UV lamp.
6.
Move
the objective such that the oil placed on it touches the bottom side of the
slide.
7.
Let
the UV light pass through the objective and get focused on the sample (i.e.,
microscopic slide) and see the fluorescence coming from the stained live cell
through the microscope eye piece.
8.
Focus
the sample seeing the fluorescence of the cell(s).
9.
Block
the UV lamp.
10.
Turn
on the FLUOVIEW software for image collection.
11.
Fix
the power of the excitation Laser beam.
12.
Let
the excitation Laser beam pass through the microscope objective.
13.
Set
the value of confocal aperture according to the magnification of the microscope
objective (e.g., 40X, 60X).
14.
Place
proper fluorescence filter (i.e., band pass filter) for selecting the
fluorescence coming from the specific region of the cells (e.g., nucleus,
microtubules etc.).
15.
Turn
on the Photo Multiplier Tube (PMT) detector to collect the fluorescence.
16.
Increase
the PMT voltage to have a good signal.
17.
Select
the area of the cell to be scanned for getting the image.
18.
Click
on the �scan once� button getting the image of the live cell sample.
19.
Save
the image by clicking the buttons in the following order: File I/O => Save Image as and then select the file type (.TIFF or
.BMP) and where to save the image and then click the �save� button to save the
image(s).
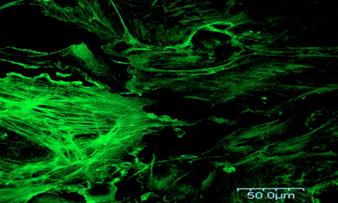
Confocal
image of BPAE tissue
REFERENCE: