To determine the coefficient of permeability of a soil using constant head method.
The knowledge of this property is much useful in solving problems involving yield of water bearing strata, seepage through earthen dams, stability of earthen dams, and embankments of canal bank affected by seepage, settlement etc.
Planning and organization
1. Preparation of the soil sample for the test
2. Finding
the discharge through the specimen under a particular head of water.
Definition of coefficient of permeability
The rate of flow under laminar
flow conditions through a unit cross sectional are of porous medium under unit
hydraulic gradient is defined as coefficient of permeability.
Equipment
1.Permeameter mould of non-corrodible material having a capacity of 1000 ml, with an internal diameter of 100 0.1 mm and internal effective height of 127.3± 0.1 mm.
2.The mould shall be fitted with a detachable base plate and removable extension counter.
3.Compacting equipment: 50 mm diameter circular face, weight 2.76 kg and height of fall 310 mm as specified in I.S 2720 part VII 1965.
4.Drainage bade: A bade with a porous disc, 12 mm thick which has the permeability 10 times the expected permeability of soil.
5.Drainage cap: A porous disc of 12 mm thick having a fitting for connection to water inlet or outlet.
6.Constant head tank: A suitable water reservoir capable of supplying water to the permeameter under constant head.
7. Graduated glass cylinder to receive the discharge.
8. Stop watch to note the time.
9.A meter scale to measure the head differences and length of specimen.
Preparation of Specimen for testing
A. Undisturbed Soil Sample
1.Note down the sample number, bore hole number and its depth at which the sample was taken.
2.Remove the protective cover (paraffin wax) from the sampling tube.
3.Place the sampling tube in the sample extraction frame, and push the plunger to get a cylindrical form sample not longer than 35 mm in diameter and having height equal to that of mould.
4.The specimen shall be placed centrally over the porous disc to the drainage base.
5.The angular space shall be filled with an impervious material such as cement slurry or wax, to provide sealing between the soil specimen and the mould against leakage from the sides.
6.The drainage cap shall then be fixed over the top of the mould.
7.Now the specimen is ready for
the test.
Disturbed Soil Sample
1.A 2.5 kg sample shall be taken from a thoroughly mixed air dried or oven dried material.
2.The initial moisture content of the 2.5 kg sample shall be determined. Then the soil shall be placed in the air tight container.
3.Add required quantity of water to get the desired moisture content.
4.Mix the soil thoroughly.
5.Weigh the empty permeameter mould.
6.After greasing the inside slightly, clamp it between the compaction base plate and extension collar.
7.Place the assembly on a solid base and fill it with sample and compact it.
8.After completion of a compaction the collar and excess soil are removed.
9.Find the weight of mould with sample.
10.Place the mould with sample in the permeameter, with drainage base and cap having discs that are properly saturated.
Test Procedure
1.For the constant head arrangement, the specimen shall be connected through the top inlet to the constant head reservoir.
2.Open the bottom outlet.
3.Establish steady flow of water.
4.The quantity of flow for a convenient time interval may be collected.
5.Repeat three times for the same interval.
Observation and Recording
The flow is very low at the beginning, gradually increases and then stands constant. Constant head permeability test is suitable for cohesionless soils. For cohesive soils falling head method is suitable.
Computation
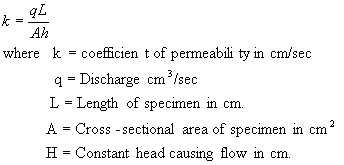
Coefficient of permeability for a constant head test is given by

Presentation of data
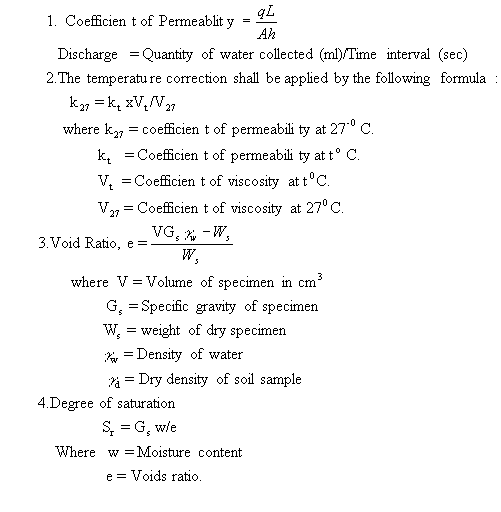
The coefficient of permeability is reported in cm/sec at 27o C. The dry density, the void ratio and the degree of saturation shall be reported.The test results should be tabulated as below:
Permeability
Test Record
Project: Tested By: ..
Location: .. Boring No. : ..
Depth:
Details of sample
Diameter of specimen ..cm
Length of specimen(L) ..cm
Area of specimen (A) ..cm2
Specific gravity of soil Gs ..
Volume of specimen (V)
..cm3
Weight of dry specimen (Ws) .gm
Moisture content .%
| Experiment No. | 1 | 2 | 3 | |
| Length of specimen | L(cm) | |||
| Area of specimen | A(cm2) | |||
| Time t | (sec) | |||
| Discharge | q(cm3) | |||
| Height of water | h(cm) | |||
| Temperature | (o C) |
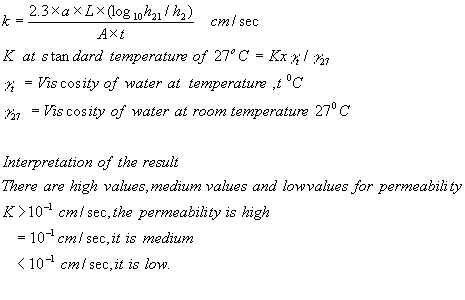
Interpretation and Reporting

b.
Falling Head Method
Objective
To determine the coefficient of permeability of the given soil sample, using falling head method.
Need and scope
The test results of the permeability experiments are used:
1.To estimate ground water flow.
2.To calculate seepage through dams.
3.To find out the rate of consolidation and settlement of structures.
4.To plan the method of lowering the ground water table.
5.To calculate the uplift pressure and piping.
6.To design the grouting.
7.And also for soil freezing tests.
8.To design pits for recharging.
Thus the study of seepage of water through soil is very important, with wide field applications.
The falling head method of determining permeability is used for soil with low discharge, where as the constant head permeability test is used for coarse-grained soils with a reasonable discharge in a given time. For very fine-grained soil, capillarity permeability test is recommended.
Principle of the Experiment
The passage of water through porous material is called seepage. A material with continuous voids is called a permeable material. Hence permeability is a property of a porous material which permits passage of fluids through inter connecting conditions.
Hence permeability is defined as the rate of flow of water under laminar conditions through a unit cross-sectional area perpendicular to the direction of flow through a porous medium under unit hydraulic gradient and under standard temperature conditions.
The principle behind the test is Darcys law for laminar flow. The rate of discharge is proportional to (i x A)
q= kiA
where q= Discharge per unit time.
A=Total area of c/s of soil perpendicular to the direction of flow.
i=hydraulic gradient.
k=Darcys coefficient of permeability =The mean velocity of flow that will occur through the cross-sectional area under unit hydraulic gradient.
Planning and Organization
The tools and accessories needed for the test are:
1.Permeameter with its accessories.
2.Standrd soil specimen.
3.Deaires water.
4.Balance to weigh up to 1 gm.
5.I.S sieves 4.75 mm and 2 mm.
6.Mixing pan.
7.Stop watch.
8.Measuring jar.
9.Meter scale.
10.Thermometer.
11.Container for water.
12. Trimming knife etc.
Knowledge of Equipment
(a) The permeameter is made of non-corrodible material with a capacity of 1000 ml, with an internal diameter of 100±0.1 mm and effective height of 127.3± 0.1 mm.
(b) The mould has a detachable base plate and a removable exterior collar.
(c) The compacting equipment has a circular face with 50 mm diameter and a length of 310 mm with a weight of 2.6 kg.
(d) The drainage base is a porous disc, 12 mm thick with a permeability 10 times that of soil.
(e) The drainage cap is also a porous disc of 12 mm thickness with an inlet/outlet fitting.
(f) The container tank has an overflow valve. There is also a graduated jar to collect discharge.
(g) The stand pipe arrangements are done on a board with 2 or 3 glass pipes of different diameters.
Preparation of the Specimen
The preparation of the specimen for this test is important. There are two types of specimen, the undisturbed soil sample and the disturbed or made up soil sample.
A. Undisturbed soil specimen
It is prepared as follows:
1. Note down-sample no., borehole no., depth at which sample is taken.
2.Remove the protective cover (wax) from the sampling tube.
3.Place the sampling tube in the sample extract or and push the plunger to get a cylindrical shaped specimen not larger than 85 mm diameter and height equal to that of the mould.
4.This specimen is placed centrally over the drainage disc of base plate.
5.The annular space in between the mould and specimen is filled with an impervious material like cement slurry to block the side leakage of the specimen.
6.Protect the porous disc when cement slurry is poured.
7.Compact the slurry with a small tamper.
8.The drainage cap is also fixed over the top of the mould.
9.The specimen is now ready for test.
B. Disturbed Specimen
The disturbed specimen can be prepared by static compaction or by dynamic compaction.
(a)Preparation of statically
Compacted (disturbed) specimen.
1.Take 800 to 1000 gms of representative soil and mix with water to O.M.C determined by I.S Light Compaction test. Then leave the mix for 24 hours in an airtight container.
2.Find weight W of soil mix for
the given volume of the mould and hence find the dry
![]()
3.Now, assemble the permeameter for static compaction. Attach the 3 cm collar to the bottom end of 0.3 liters mould and the 2 cm collar to the top end. Support the mould assembly over 2.5 cm end plug, with 2.5 cm collar resting on the split collar kept around the 2.5 cm- end plug. The inside of the 0.3 lit. Mould is lightly greased.
4.Put the weighed soil into the mould. Insert the top 3 cm end plug into the top collar, tamping the soil with hand.
5.Keep, now the entire assembly on a compressive machine and remove the split collar. Apply the compressive force till the flange of both end plugs touch the corresponding collars. Maintain this load for 1 mt and then release it.
6.Then remove the top 3 cm plug and collar place a filter paper on fine wire mesh on the top of the specimen and fix the perforated base plate.
7.Turn the mould assembly upside down and remove the 2.5 cm end plug and collar. Place the top perforated plate on the top of the soil specimen and fix the top cap on it, after inserting the seating gasket.
8.Now the specimen is ready for
test.
(b) Preparation of Dynamically Compacted Disturbed sample:
1.Take 800 to 1000 gms of representative soil and mix it with water to get O.M.C, if necessary. Have the mix in airtight container for 24 hours.
2.Assemble the permeameter for dynamic compaction. Grease the inside of the mould and place it upside down on the dynamic compaction base. Weigh the assembly correct to a gram (w). Put the 3 cm collar to the other end.
3.Now, compact the wet soil in 2 layers with 15 blows to each layer with a 2.5 kg dynamic tool. Remove the collar and then trim off the excess. Weigh the mould assembly with the soil (W2).
4.Place the filter paper or fine wore mesh on the top of the soil specimen and fix the perforated base plate on it.
5.Turn the assembly upside down and remove the compaction plate. Insert the sealing gasket and place the top perforated plate on the top of soil specimen. And fix the top cap.
6.Now, the specimen is ready for test.
Experimental Procedure
1.Prepare the soil specimen as specified.
2.sturate it. Deaired water is preferred.
3.assemble the permeameter in the bottom tank and fill the tank with water.
4.Inlet nozzle of the mould is connected to the stand pipe. Allow some water to flow until steady flow is obtained.
5.Note down the time interval t for a fall of head in the stand pipe h.
6.Repeat step 5 three times to determine t for the same head.
7.Find a by collecting q for the stand pipe. weigh it correct to 1 gm and find a from q/h=a.
Therefore the coefficient of permeability

Observation and Recording:

|
1st set |
2nd set | |
|
1.Area of stand pipe (dia. 5 cm) a 2.Cross sectional area of soil specimen A 3.Length of soil specimen L 4.Initial reading of stand
pipe
h1 5.Final reading of stand pipe h2 6.Time t 7.Test temperature T 8.Coefficient of permeability at T kt 9.Coefficient of permeability at 27o C k27
|
General Remarks:
1. During test there should be no volume change in the soil, there should be no compressible air present in the voids of soil i.e. soil should be completely saturated. The flow should be laminar and in a steady state condition.
2. Coefficient of permeability is used to assess drainage characteristics of soil, to predict rate of settlement founded on soil bed.