
INDIAN INSTITUTE OF TECHNOLOGY KANPUR
Department of Materials and Metallurgical Engineering
Virtual Laboratories for Thermal Processing and Characterization of Materials
 |
INDIAN INSTITUTE OF TECHNOLOGY KANPUR Department of Materials and Metallurgical Engineering Virtual Laboratories for Thermal Processing and Characterization of Materials |
|
Microscopy Laboratory |
Experiment 2
Quantitative Microscopy
Objectives
The objective of this lab is to (i) perform volume fraction analysis manually on a multi-phase sample, (ii) manually estimate the grain size and grain boundary surface area per unit volume of a single-phase polycrystal, and (iii) perform measurements in (i) and (ii) using the image analysis system.
Theory
The relationship between microstructure and property (also known as structure-property correlation) of materials is well established. One such relationship for single-phase polycrystalline materials is the well-known Hall-Petch equation: s=so+Kd-1/2; where s is the flow stress, d is the grain size, so and K are constants. The microstructural observations are generally made on 2-dimensional sections (or plane of polish) which cut through the 3-dimensional structure of materials. Many methods have been developed to obtain parameters of the 3-dimensioanl structure from measurements made on the plane of polish. These methods constitute what is known as the field of stereology. A simple illustration of this is the estimation of volume fraction of a particular phase in a multi-phase alloy. A grid of points is superimposed on the microstructural image (illustrated in figure 2.1). The ratio, PP, of the number of points (n) falling in the phase of interest (the black graphite nodules in figure 2.1) to the total number of grid points (N) is obtained. This ratio is directly the statistical estimate of the volume fraction of the phase, VV:
VV = PP = n/N (2.1)
The above method is simply termed as the Point Count Technique. Similarly, in the technique of Areal Analysis, the volume fraction is equated to the estimate of the area fraction (AA) of the phase on the 2-dimensional section.
Estimation of grain size of polycrystalline materials is probably one of the most important parameters because of its strong influence on properties. However, the problem of determining the size of 3-dimensional grains constitutes one of the hard-problems in stereology. Therefore, one generally determines a single value and uses it to represent an average planar grain size. Several different measurements can be used to represent this average value: average diameter, average area, number of grain per unit area, average intercept length, number of grain per unit volume, average diameter based on average grain volume.
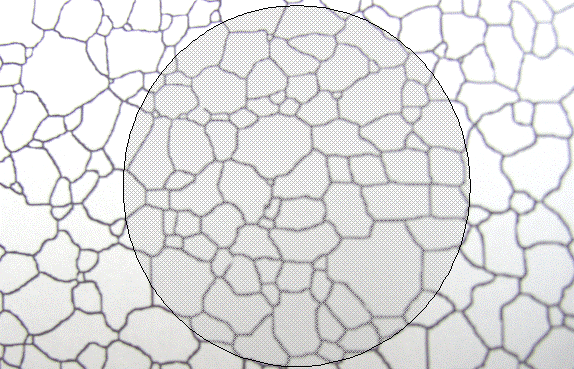
The Jeffries method involves the counting of number of grains in
a circular or a rectangular area marked on the microstructure (see figure 2.2a).
The grains which are only partly inside the marked area are counted as half.
From the count, number of grains per unit area (NA) is
determined. The grain diameter, d, is related to the average grain area (![]() ):
):
![]() (2.2)
(2.2)
The mean intercept length is probably the most accepted
method for the estimation of grain size. In the intercept length method, the
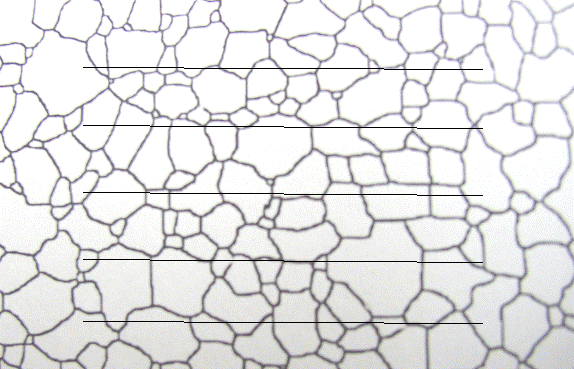
polycrystalline microstructure is generally superimposed by a grid of parallel
lines (see figure 2.2b) and the number of intercepts (intersections with grain
boundaries) per unit length (PL) is obtained. The mean
intercept length (![]() )
is given by:
)
is given by:
![]() (2.3)
(2.3)
The grain size is often characterized by an ASTM Grain Size Number (G). The ASTM grain size number is defined as given below:
![]() (2.4)
(2.4)
where, n is the number of grain per square inch at a magnification of 100X. Appropriate modifications can be done to the above equation if counting is done at magnifications other than 100X. It is easy to see that there is a direct relationship between the ASTM Grain Size Number and Grain Diameter obtained from the Jeffries method. The relationship between the ASTM Grain Size Number and the Mean Intercept Length is given by:
![]() (2.5)
(2.5)
In order to obtain an accurate measure of the various parameters, such as, volume fraction, grain size, etc., a statistically significant number of fields must be measured. It should be noted that stereological measurements are statistical estimates and not absolute measures. On repeating the measurement several times, one does not get the same exact value. If the material is relatively uniform and good techniques are employed than the scatter will be quite small. Thus, it is useful to obtain some statistical parameters which give some idea of the statistical variation in the estimated value of the stereological parameter. Some of the important statistical parameters are: coefficient of variation (CV), 95% confidence limit (95% CL), and % relative accuracy (RA). Consider a stereological parameter (x), which is estimated several times by repeated measurements. The coefficient of variation is given by:
![]() (2.6)
(2.6)
where,
![]() is
the mean value of the measurement and s is the standard deviation of the
measurement given by:
is
the mean value of the measurement and s is the standard deviation of the
measurement given by:
 (2.7)
(2.7)
where, n is the number of measurements.
The 95% Confidence Limit is given by:
![]() (2.8)
(2.8)
where t varies with the number of measurements, n. Table 2.1 lists the values of t. 95% CL value obtained from the above equation is interpreted as follows: the value obtained gives the extent of deviation which has a probability of 95%. It is also useful to calculate the % Relative Accuracy, which is given by the following expression:
![]() (2.9)
(2.9)
For many measurements a 10% relative accuracy is quite satisfactory. Equation (2.9) may be used to estimate the minimum number of fields to measure to obtain the result within a desired accuracy.
|
n-1 (number of degrees of freedom) |
t value (95% CL) |
n-1 (number of degrees of freedom) |
t value (95% CL) |
|
1 |
12.706 |
18 |
2.101 |
|
2 |
4.303 |
19 |
2.093 |
|
3 |
3.182 |
20 |
2.086 |
|
4 |
2.776 |
21 |
2.080 |
|
5 |
2.571 |
22 |
2.074 |
|
6 |
2.447 |
23 |
2.069 |
|
7 |
2.365 |
24 |
2.064 |
|
8 |
2.306 |
25 |
2.060 |
|
9 |
2.262 |
26 |
2.056 |
|
10 |
2.228 |
27 |
2.052 |
|
11 |
2.201 |
28 |
2.048 |
|
12 |
2.179 |
29 |
2.045 |
|
13 |
2.160 |
30 |
2.042 |
|
14 |
2.145 |
40 |
2.021 |
|
15 |
2.131 |
60 |
2.000 |
|
16 |
2.120 |
120 |
1.980 |
|
17 |
2.110 |
¥ |
1.960 |
Methodology and Results
Microstructures of pure iron and a plain carbon steel are to be examined and quantified by appropriate stereological parameters. For this the materials need to be sectioned, polished and etched, and observed under a metallurgical microscope..
(i) The damage introduced to the surface during sectioning is removed by grinding on a belt-grinder. To minimize heat-generated damage wet grinding is usually done. The coolant used most commonly is water.
(ii) The surface is then subjected to grinding on emery paper of varying grades, starting from coarse to fine grade. Typically 4 different grades are employed: 10, 20, 30, and 40. The direction of grinding, with reference to the sample, must not be held constant throughout the grinding sequence. For best results, the direction of grinding should be varied by 90o between steps. Ensure that in each step the scratches on the sample surface from the previous step have been completely eliminated. Between each step of grinding the sample should be washed briefly and dried. This prevents contamination of the next finer abrasive from loose abrasive from the previous step.
(iii) The emery paper grinding is followed by final polishing on a rotating wheel covered with a polishing cloth. The polishing abrasive applied to the polishing surface is usually alumina (Al2O3) powder, which is applied as a suspension in water during the polishing operation. Coarse polishing is accomplished by alumina powder particles of size 3mm or more. While fine polishing is done by particle size of 1mm or less. Cleaning between polishing stages is extremely important. For best results, the orientation of sample should be continuously altered while polishing.
(iv) Apply a suitable etchant to the polished surface to reveal the microstructure.
(i) Sketch the microstructures of the two samples and label the various features of the microstructures.
(ii) In the case of pure iron sample measure the number of intercepts per unit length. Repeat and note down the measurements for a large number of fields. From these measurements obtain the mean intercept length and grain boundary surface area per unit volume.
(iii) For the pure iron sample perform a count of the number of grains per unit area to obtain an ASTM Grain Size Number.
(iv) For the plain carbon steel sample find the volume fraction of pearlite and polygonal ferrite by the Point Count Method. Use the result in estimating the composition of the steel, i.e., wt.%C.
(v) Determine the % Confidence Limit and % Relative Accuracy for each of the above steological measure.
Analyse the samples on an image analysis system and compare the result with that obtained manually above.Conclusions
Note the major conclusions obtained in the experiment.
Questions
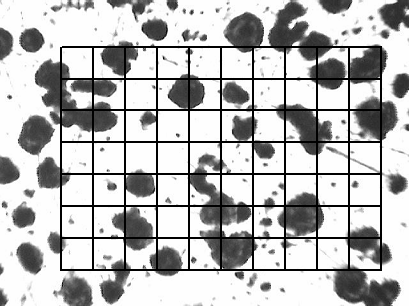
Figure 2.1: Illustration of the Point Count Technique for the estimation of volume fraction of graphite nodules in S.G. cast iron
(a)
(b)
Figure 2.2: Illustration of procedures for the measurements of mean grain size in a single phase polycrystalline material: (a) Jeffries Method, and (b) Intercept Method.