
INDIAN INSTITUTE OF TECHNOLOGY KANPUR
Department of Materials and Metallurgical Engineering
Virtual Laboratories for Thermal Processing and Characterization of Materials
 |
INDIAN INSTITUTE OF TECHNOLOGY KANPUR Department of Materials and Metallurgical Engineering Virtual Laboratories for Thermal Processing and Characterization of Materials |
|
Microscopy Laboratory |
Experiment 1
Observation of Microstructures in a Light-Optical Microscope
Objectives
The objective of this lab is to (i) get acquainted with the functioning of the metallurgical microscope, and (ii) observe and interpret the microstructures of the given samples.
Theory
The function of a microscope is to transform an object into an image, which is generally magnified to varying degree. There are many sophisticated techniques (such as, electron microscopy) available to perform this transformation. However, the principles involved are just the same as those developed for light microscopes as far back as 4 centuries ago. The underlying concept of any imaging system can be understood in terms of the light-optical microscope.
The simplest optical microscope is the single convex lens or the magnifying lens. There are two important classes of optical microscopes: transmission type and reflection type of microscopes. The optical arrangements for these two classes of microscopes are shown in figures 1.1a and 1.1b. The same two types arise in electron microscopy, leading to transmission electron microscopy and scanning electron microscopy. A vital part of the optical microscope is the illumination system, which consists of a light source and a condenser lens. The purpose of the condenser is to focus a diverging light beam from the source onto the small part of the specimen (object A) being examined. Most light microscopes use a two-lens system: an objective lens and an eyepiece (often termed as projector lens). The objective lens forms an intermediate image B, which is further, magnified by the eyepiece. Using objective lenses of different focal lengths varies the magnification in these microscopes. Usual magnifications found commonly are 50X, 100X, 200X, 250X, 500X and 1000X. A 35mm camera arrangement for photography of the images and/or a CCD (charged coupled device) camera for digitizing the images, which can be stored in a computer, are very common accessories in the modern light microscopes.
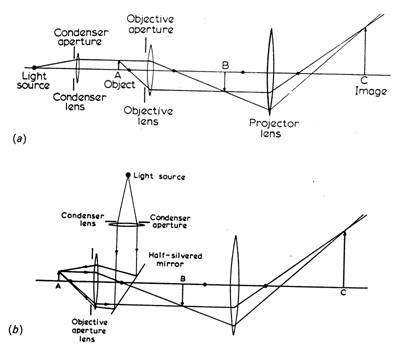
Figure 1.1: The optical ray diagram for (a) transmitted illumination and (b) reflected illumionation.
The performance of any microscope can be understood in terms of two important parameters: resolution and depth of field. Resolution is simply defined as the closest spacing between two points, which can be clearly seen through the microscope as two separate entities. The resolution (r) is given by the equation proposed by Lord Rayleigh:
![]() (1.1)
(1.1)
where, l is wavelength of light, m is the refractive index of the medium between the object (specimen) and the objective lens, and a is the semi-angle subtended (see figure 1.2a). The term msina is also known as the numerical aperture. Using equation (1.1), the best resolution that can theoretically be obtained is in the range 150 to 200 nm. However, the various aberrations in the lenses would make degrade this resolution. The depth of field is defined as the range of positions for the object (specimen) for which the eye detects no change in sharpness of the image (see figure 1.2b). The depth of field (h) is given by:
![]() (1.2)
(1.2)
The depth of field is in the light microscope is of the order of 1 mm. Thus, the depth of field is very small and therefore, for getting sharp images care has to be taken in sample preparation. The specimen surface has to be very flat and horizontal.
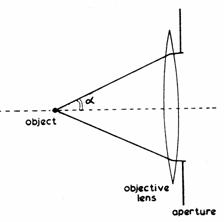
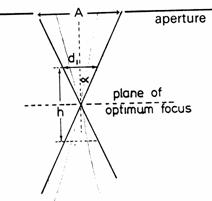
Figure 1.2: The definition of (a) half-angle a subtended by the objective aperture, and (b) depth of field h.
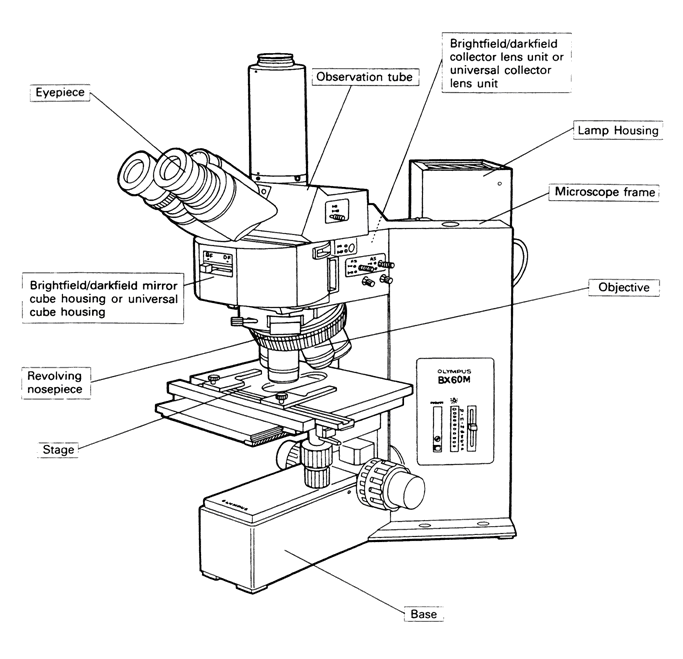
The samples that are typically used in the area of materials science and engineering are opaque and consequently the optical microscope used is of the reflecting type (discussed above). Figure 1.3 shows clearly labeled sketches of a typical commercial optical microscope. It may be noted that the objective lenses mounted on the revolving nosepiece permit easy changeover of objective lenses of different magnifications. The stage on which the sample is put can be moved in the xy plane (horizontal plane). A 35mm film camera or a CCD camera can be installed on the vertical tube at the top (see figures 1.3) for taking photographs of the microstructures.
Methodology
Now establish a remote connection to the optical microscope. After establishing the connection, you will see a live image of the microscope. Procedure for starting the computer program and observing the microstructures is given here. Save and transfer the microstructural images to the local computer.
Results and Discussion
(i) The magnification is changed by rotating the revolving nosepiece (see figure 1.3) to bring objectives of different focal lengths and/or numerical aperture in place.
(ii) The focusing is achieved by using the coarse and fine focus knobs to adjust the distance between the objective and the sample. It is important that during focusing care should be taken to prevent the objective lens from crashing onto the surface of the sample (particularly at higher magnification where objective lens comes very close to the sample surface). It is good practice to start focusing in steps starting from the lowest magnification objective.
(iii)The area of observation on the sample can be changed by using the x and y stage movement knobs generally located below the stage (see figure 1.3).
(i) Plain carbon steels of compositions: 0.2 wt%C (hypoeutectoid steel), 0.8 wt%C (eutectoid steel) and 1.2 wt%C (hypereutectoid steel).
(ii) Cast irons: white cast iron, gray cast iron and spherodized graphite (SG) iron.
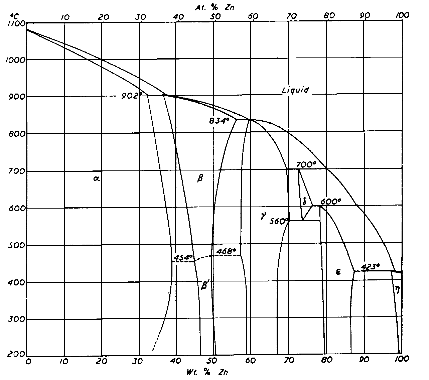
(iii)Brass of composition Cu-40wt%Zn
(i) Observe the microstructures at different magnifications and regions of the samples. Make a note of the numerical aperture of the objective.
(ii) The observed microstructures may show many artifacts (i.e., features which are not part of the structure). The most commonly observed artifacts are etch-pits (pits produced on the surface during etching) and scratches (produced during polishing). It is easy to recognize etch-pits by the fact that both, the microstructural elements (such as grains and grain boundaries) and the etch-pits do not appear in sharp focus simultaneously. By using good sample preparation techniques these artifacts can be minimized.
(iii)For each sample, identify the phases observed in the microstructures.
(iv)Observe and sketch the salient features of each microstructure. The sketched microstructure should represent the typical structure and not a copy of any particular area. Clearly label the different elements in the sketched microstructures.
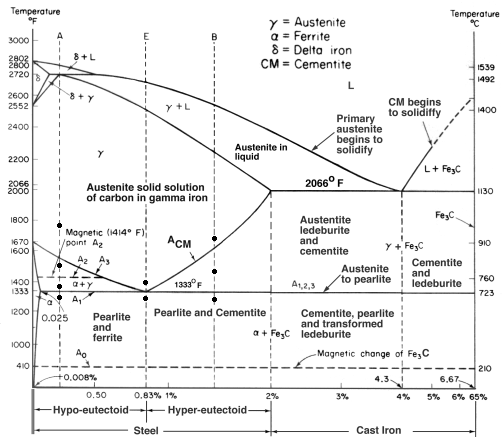
Correlate the observed microstructures with that expected from the phase diagram (see figures 1.4).
(a)
(b)
Figure 1.4: (a) Fe-Fe3C and (b) Cu-Zn phase diagrams.
Conclusions
List the major conclusions of this experiment.
Questions
Check here for
microscope and
related to
objective
The Fastest
FTPS
on the planet
Go FTP FREE
Software